
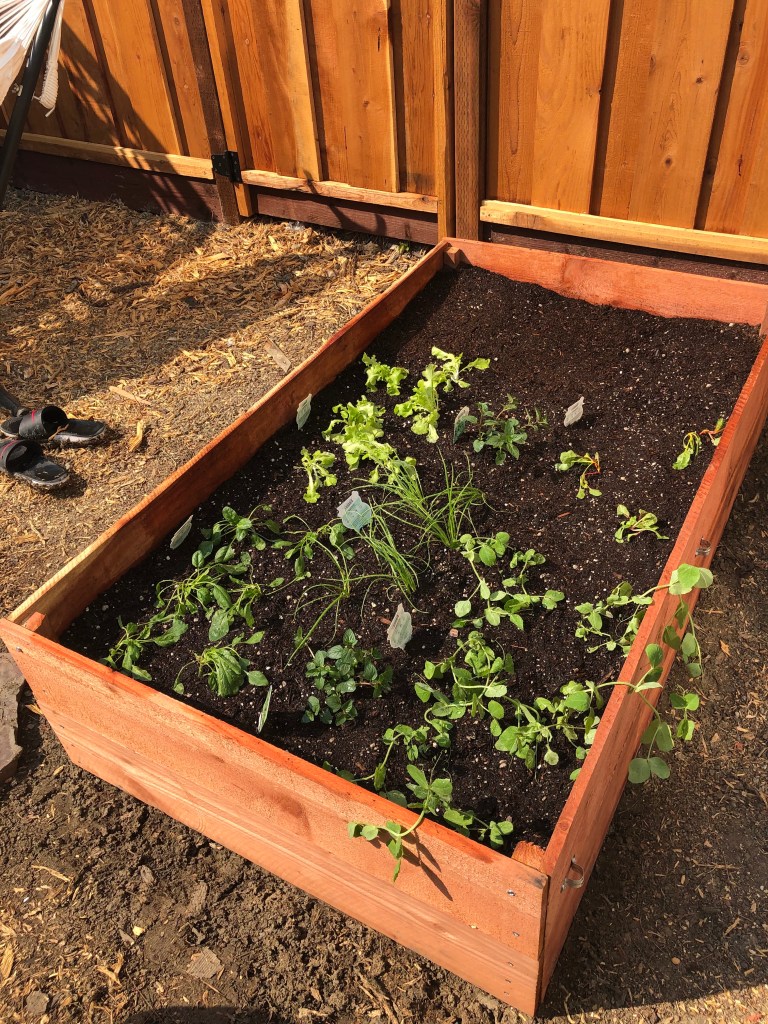
Winter Garden 2018, with snap peas, beets, carrots, onions, peppermint, and leafy greens. 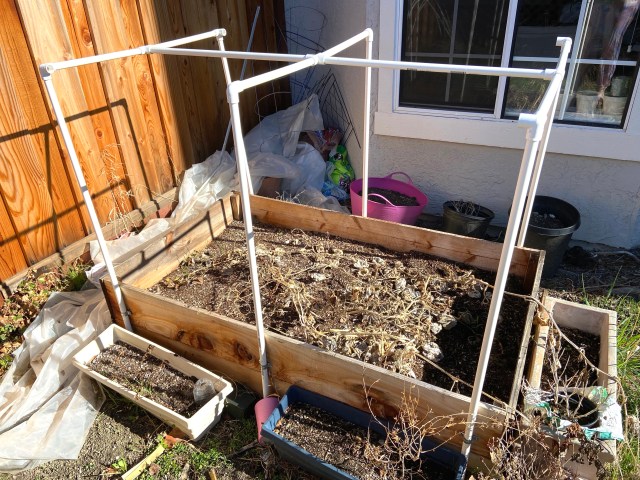
Winter 2020, with the plants from our summer garden contributing to our soil ecosystem. 
Close-up of pipe straps and screw hook.
Gardening in small spaces
Ever tried to grow veggies in a container garden with LOTS of planters? I have, and I wouldn’t describe those crops at bountiful. Don’t get me wrong, there were upsides to container gardening such as being able to move plants around as needed if their original spot was getting too much or not enough sun. I also realize that I’m fortunate to have outdoor space at all for gardening, especially when apartment living could call for additional creative solutions in this area. However, with our current backyard situation, there were a few key factors to overcome to optimize our garden:
- Limited square footage – Check!
- Soil that is almost 100% clay and a real pain to dig into – Check!
- West facing so the plants get roasted in the afternoon – Check!
To make the most of our backyard space for gardening, I decided to build a raised garden bed. That way, we could optimize our space, avoid digging through the clay to make an in-ground bed, and provide a centralized place for the plants to be covered and protected from the elements. I tend to shy away from things that require power tools, but after looking at the cost of prebuilt options or kits, and considering the specific size I wanted the bed to be, it was time to make a plan to DIY this thing! To combat the heat from the afternoon sun, I also attached some brackets for PVC piping, then attached some plastic sheeting to make a mini greenhouse.
I tend to underestimate the difficulty of DIY projects, thinking they will be easier than they actually turn out to be. This raised garden bed was the exact opposite experience for me. I was surprised that in a few hours, I had pieced together a garden bed, greenhouse cover, and placed my soil and seeds/seedlings.
Supplies for the raised bed:
- 6 natural wood fencing boards, measuring 1 inch x 6 inch x 6 feet
- 4 of the boards remain at 6 feet long
- 2 of the boards are cut in half to give you 4 boards that are 3 feet long. (This was a free feature at the hardware store I shopped at, and saved me from having to find a saw).
- 4 wood posts to reinforce the corners. I used 1 inch x 1 inch square boards and also had these cut at the hardware store so that the pieces were each 12 inches long.
- 16 Rust proof nails or screws, 1 inch long
- Power drill or hammer
Supplies for removable green house:
- 6 pipe straps, 1 1/4 inches, as well as 12 nails or screws to attach
- 1 inch x 10 foot PVC cut into the following lengths:
- 6 pieces that are 4 feet long
- 7 pieces that are 3 feet long
- 4 socket elbows for 1 inch PVC pipe, 90 degrees
- 2 4-way T-sockets for 1 inch PVC pipe
- Plastic sheeting and/or garden shade cloth
- 8 screw in hooks
Instructions for raised garden bed:
- Gather the lumber and bring to the area you eventually want your raised garden bed to live. (Don’t be like me and build it, then have to maneuver a finished product as tall as you are across your yard!)
- Attach a 1 inch x 1 inch post to both ends of 2 of the short boards. Repeat with another 1 inch x 1 inch post and the remaining short boards.
- Attach 1 of the short walls you’ve made to the end of 2 of the 6 foot long boards with screws/nails through the 1 inch x 1 inch posts. Repeat with the other short wall, attaching to the opposite end of the 6 foot long boards you just worked on.
- To finish the walls of your raised garden bed, attach the remaining 6 foot long boards on the other side.
If you choose to not build a removable greenhouse for your garden bed, then you’re done. Congratulations! Get yourself some soil, compost, and seeds or seedlings to get your garden going.
Instructions for removable greenhouse cover:
- Facing a longer side of your project, attach 3 pipe straps at the top of the bottom board, two for the ends near the corners, and one in the middle. Repeat on opposite side.
- Attach a screw hook between each of the pipe straps on the longer side of your raised garden bed. Then attach 2 screw hooks near the middle of one shorter side, then the other. You’ll need these later to keep your plastic sheeting or garden shade in place,
- Place a 4 foot long piece of PVC into each of the pipe straps.
- Connect the 4 socket corners fittings to each PVC pipe above the corners of the garden bed, then the pair of 4 way T-sockets to the remaining PVC pipe ends.
- The 3 foot pieces of PVC connect to each of the open socket spaces, 3 going across width-wise, and 4 going across length-wise.
- Drape your plastic sheeting and/or garden shade fabric over the PVC frame, attaching to the screw hooks you added earlier. For watering and easy access to your garden, I recommend cutting an opening in the fabric/sheeting at both short ends of the garden bed. You can secure these bits with the 2 hooks on the short side of the garden bed as needed.
